Monday, September 25, 2017

Tutorial Lengkap Debian By Eko

Part1   instalasi
Install debianserver
Masuk bios lalu pindah ke tab boot
Boot device priority>klik enter arahkan usb flasdisk ke nomer 1 dengan tekan f5> tekan f10 dan enter
Klik install
Language : inggris
Country : other > asia> Indonesia
Country to base default locale setting : united states – em_US .UTF-8 keymap to use > american English
Primary network  eth1: realtek qualqom
Hostname : server-1
Domain name : lksmojokerto-1.id
Root password : lksmojokerto
Re-enter password Verivicaty : lksmojokerto
Fullname for new user : eko effendi
Username for account : eko
Choose password the new user: user
Select a city : western (sumatra,Jakarta,java,west and central Kalimantan)
Partitioning : manual
Pilih hardisk. Hardisk saya berkapasitas 500GB
Create new partition
New partition size . partisi ini 16gb untuk partisi swap
Ketik 16GB enter > primary> beginning>   use as pilih swap area> done setting up the partition done setting up the partition
Enter lagi hardisknya create new partition
220GB untuk root
Ketik 220GB enter>logical> End> use as> /root
the partition done setting up the partition

Enter lagi hardisknnya create new partition
Langsung enter saja karena partisi terakhir langsung enter> logical>End> use as ex4 journalist file system
the partition done setting up the partition
finish partitioning and write change to disk
enter lalu pilih standart system unilities.
Install GRUB boot loader the master boot record? Yes
Installation complete > enter

Masuk sebagai root
User :root
Password : lksmojokerto
Nano /etc/network/interfaces
Tulis script
Auto eth1
Iface eth1 inet static
Address 192.168.1.2
Netmask 255.255.255.252
Network 192.168.1.0
Broadcast 192.168.1.3
Gateway 192.168.1.1
Tekan ctrl+X dan y lalu enter
Update repository
Nano /etc/sources.list
Hapus semua script dan tulis
Deb-src http://lksmojokerto.id/debian jessie main
Tekan ctrl+X dan y lalu enter
/etc/init.d/network restart untuk merestart settingan LAN

Instalasi windows 10
Masuk bios lalu pindah ke tab boot
Boot device priority>klik enter arahkan usb flasdisk ke nomer 1 dengan tekan f5> tekan f10 dan enter
Tekan pres any key
Language : English united states
Time an currency format: Indonesia
Keyboard method : US
Enter
Enter untuk install now
Centang I accep licensie tems>enter
Enter Custom install windows only (advanced)
hardisk leptopny 500GB
Kita bagi 2 menjadi 250GB
Delete semua partisi lama dan klick new di unallocated space dan isi 250000 klik apply
Klik lagi sisanya dan langsung enter
Arahkan di drive partition 1
Lalu next dan enter
Tunggu Sampai selesai
Lewati saat produck key
Klick use express setting>skip this step> isi nama pc menjadi laptop-1> username : lks2017-1 dan password: lksmojokerto
Lalu connect kan ke wifi kita tadi.


JOB SHEET SETTING MIKROTIK DAN INSTALL DEBIAN
Mikrotik
·       Kita isi interfacenya dulu.
          1.ether1  192.168.200.1/27
          2.ether2  192.168.2.1/30
          3.wlan1   192.168.1.1/24
Pindah ke tab dns 192.168.200.30
Pindah ke routes isi gateway 192.168.200.30
Pindah ke firewall NAT output eth1 action masquarade
·       Pengaktifan wlan1 dengan SSID LKS-1
1.centang hide SSID lalu pindah ke tab security profiles,isi password WPA pre shared key di isi sesuai soal dengan  password lksmojokerto-1
2.membuat hotspot server isi username (admin) dan password (admin)
·       -Blocking webfig : ip>firewall>general
chain : input
protocol: 6(tcp)
dst.port : 80
action : drop

-         Blocking ping dari client ke server   : ip>firewall>general
Chain : input
Dst.adrres : 192.168.1.1
Protocol:  icmp
In.interface wlan1
Action : drop
-         Blocking akses dari eth1
Ip>firewall>general 
Chain : forward
src.address 192.168.200.30
action : drop
·       Vpn : set up a new connection or network> connect to a workplace>next>use my internet connection> (ip Wlan 192.168.21.1)
Debian
-Reverse proxy
Apt-get install apache2 libapache2-mod-proxy-html
Cd /etc/apache2/
Nano apache2.conf,   tambah script
<proxy*>
    Order deny.allow
    Allow from all
</proxy>
Pindah ke directori apache
Cd /etc/apache2/sites-available
Nano 000-default-conf
Tambah scritp
<virtualhost reverse.lksreverse-1.id.80>
Servername lksreverse.id
Proxypass  / http:mojokerto-1.id/
    Proxypassreverse   /    http://mojokerto-1.id/
</virtualhost>
- NTP server
Apt-get install ntp ntpdate
Tambah script
Server 127.127.1.0
Fudge 127.127.0.1 stratum 1
/etc/init.d/ntp restart
Untuk mengecek ntpdate –u 127.0.0.1
-         Ssh server
Apt-get install ssh
Nano/etc/sssh/sshd_config
Di ubah menjadi port 221
-         Web server dan secure web server
Apt-get install apache2 php5 mysql-server
Cd /etc/apache2/sites-available
nano 000-default.conf
     serveradmin webmaster@lksmojokerto.id
     serverName www.mojokerto-1.id
     serveralias mojokerto-1.id
     documentroot /home/site/mojokerto
mksdir /home/site/mojokerto
cp /var/www/html/index /home/site/mojokerto
ubah index.html menjadi seperti di soal
nano /home/site/mojokerto/index.html
hapus semua dan ubah script menjadi
<html>
<titile>script website utama</title>
<body> <br>selamat dating di</br>
<br>lomba komptensi siswa tingkat kab.mojokerto</br>
<br>bidang lomba IT/Networking support</br>
<br>2017</br>
</body>
</html>
Service apache 2 restart
-         Dns
Apt-get install bind9
Masuk ke directory nano /etc/bind/named.conf.local
Zone “lksreverse-1.id” {
   Type master;
   File “/etc/bind/db.a” ;
};

Zone “mojokerto-1.id” {
   Type master;
   File “/etc/bind/db.b” ;
};

Zone “1.168.192.in-addr.arpa” {
   Type master;
   File “/etc/bind/db.c” ;
};

Zone “1.168.192.in-addr.arpa” {
   Type master;
   File “/etc/bind/db.d” ;
};

Copy file db.local > db.a
Copy file db.127 > db.c


Nano db.a
Ubah localhost menjadi lksreverse.id
Dan dibawahnya
@  IN NS   lksreverse-1.id.
@  IN A   192.168.1.2
www IN  A  192.168.1.2
ftp IN  A  192.168.1.2
sub-domain IN  A  192.168.1.2
mail IN  A  192.168.1.2
tekan ctrl x dan y enter

Copy file db.a > db.b
Nano db.b
 Ubah lksreverse menjadi mojokerto-1.id
Tekan ctrl x dan y > enter
Nano db.c
Ubah localhost menjadi lksreverse-1.id.
@  IN  NS lksreverse-1.id
1.1.168 IN PTR lksreverse-1.id.
Tekan ctrl x dan y > enter

Cp db.c db.d
Nano db.d
Ubah lksreverse-1.id menjadi mojokerto-1.id
Tekan ctrl x dan y > enter

Nano /etc/resolv.conf
Nameserver 192.168.1.2

/etc/init.d/bind9 restart
Lalu cek nslookup lksreverse-1.id
Lalu cek nslookup mojokerto-1.id


Monday, September 18, 2017

Reset User Manager


I. CARA MELIHAT PASSWORD USERMAN

           /tool user-manager customer pr

       Cara ini hanya untuk melihat  user dan passwordnya

       tidak menghapus databasenya


II. CARA RESET PASSWORD USERMAN

        1. Buka Mikrotik melalui Winbox

        2. Klik pada 'New Terminal'
        3. Ketik      /tool user-manager database clear     
kemudian enter
        4. Bila mucul peringatan bahwa database user-manager akan dihapus, tekan  'Y'
        5. Selesai, sekarang coba buka userman-nya

       Cara ini untuk menghapus  user dan password serta

       menghapus databasenya

Tuesday, September 12, 2017

Setting Userman Lengkap

Pengertian User Manager dan Radius

User Manager (userman) adalah Package Radius Server pada RouteOS Mikrotik yang berbasis web sehingga dapat mempermudah dalam pengelolaan user. Jadi, dengan adanya userman kita bisa membuat user sebanyak-banyak dalam 1 klik, dan user yang telah habis masa aktif penggunaannya akan otomatis logout dan tidak dapat mengakses internet, bsia membatas waktu penggunaan otomatis, bisa memberi limit kecepatan akses internet utk client, dan lain sebagainya

Radius adalah protokol jaringan yang menyediakan layanan terpusat Authentication, Authorization, dan Accounting (AAA) sudah tentu ia memiliki database untuk mengelola user pada jaringan yang kita kelola, cakupannya pun sangat luas karna banyak layanan yang dapat di-autenkasi mengunakan user manager :

  1. Hotpsot Server
  2. VPN Server atau PPP Server (PPTP, L2TP, PPOE, OVPN dan lain sebagainya)
  3. DHCP Server
  4. Wireless
  5. RouterOS Login

Fungsi User Manager

Keuntungan menggunakan User Manager adalah keamanan jaringan dan kemudahan dalam mengelola user yang banyak dalam waktu singkat/cepat serta dapat dioptimalkan lagi dengan System Ticket.

User Manager juga memungkinkan kita untuk mengatur batasan billing user berdasarkan:

  • Waktu (time based)
  • Kuota (quota based)
  • Kecepatan (rate limit)

Langkah Kerja

Bismillahirrohma nir rohim... Sebelum kita mulai cara setting userman, terlebih dahulu kita harus lakukan instalasi paket userman di RouterOS sesuai dengan versi routerOS dan arsitektur prosesor nya supaya userman dan radius dapat berjalan dengan sempurna, baik dan lancar :)

1. Cari tahu jenis Arsitektur dan Versi RouterOS Anda:
Dari winbox klik system, pilih resource, temukan Architecture Name dan Versionseperti pada gambar dibawah ini (lihat figure 1)
cara setting user manager (userman)


2. Download package userman sesuai arsitektur dan versi routeros anda di http://www.routeros.co.id/ or klik disini
lihat gambar dibawah ini (figure 2)


3. Buka menu Files di Winbox, biarkan saja kotak files mikrotik terbuka
lalu buka Windows Explorer, masuk ke folder download anda tempat meletakkan package tadi

4. Extract package yang telah Anda download
temukan file userman-516-mipsbe.npk, kemudian upload ke dalam box files mikrotik. caranya: dari folder download tadi dari menu utama Winbox klik Files, kemudian seret atau drag seperti gambar dibawah ini (lihat figure 3)
cara setting user manager (userman) mikrotik
click to enlarge / klik untuk memperbesar tampilan gambar

5. Tunggu proses uploadnya hingga selesai

6. Masih di menu utama Winbox, Anda klik  System , lalu pilih  Reboot 
- jika ada konfirmasi, jawab dengan ok/yess
- tunggu beberapa saat, setelah mikrotik reboot proses instalasi akan berjalan otomatis
- jika berhasil akan tampak seperti gambar dibawah ini (figure 4)
cara setting userman mikrotik
untuk melihat tampilan menu ini dari winbox, klik menu system, pilih package
pada artikel ini kami akan memberikan contoh cara setting user manager untuk otentikasi user hotspot, jadi kita mesti lanjut ke langkah ke-7. simak lagi yukkk!!!

Baca juga: Setting Mikrotik Single WAN cocok untuk Semua ISP


Konfigurasi User Manager (setting userman)
Userman dapat Anda konfigurasi apabila paketnya sudah di-install dengan benar, setelah itu untuk mengelola user hotspot dengan menggunakan userman diperlukan browser dalam mengakses web interface userman. OK langsung saja, silakan Anda buka browser kesukaan Anda bisa pakai Mozila Firefox atau yang lainnya, kalau penulis lebih suka pakai Browser Google Chrome :)

7. Masukkan alamat web interface untuk konfigurasi userman http://IP_Address_Mikrotik/userman
- IP Address Miktotik saya yang terhubung ke hub : 192.168.0.1
- Jadi, untuk mengakses laman konfigurasi userman adalah http://192.168.0.1/userman
- login default konfigutasi userman : admin
- default password userman mikrotik: kosong/tidak ada password
- lalu tekan enter atau klik login
Lihat contoh pada gambar dibawah ini!
figure-5. menu administrasi userman

8. Kami sarankan Anda untuk mengganti password admin userman, caranya:
pada sisi kiri halaman web userman, klik menu Customer
akan tampil isi dari menu customer
klik admin pada kolom login.
cara setting user manager atau userman
figure-6. cara mengganti password pengelola userman
9. Kembali ke winbox, kita akan menghubungakan Radius Client ke Userman agar bisa mengautenkasi client yang ingin menggunakan internet di jaringan hotspot kita:
- pada menu utama winbox, klik RADIUS
- klik tanda plus + seperti tampilan ini (figur-7. Radius Client pada Router)
cara setting user manager atau userman di mikrotik

10. Jika sudah klik + akan muncul tampilan setting Radius, pada tabmenu General,
Centang/contreng service  hotspot 
Address : 127.0.0.1 (karena radius dan userman berada di internal mikrotik ini)
Secret: rahasia (ini hanya contoh, silakan isi dgn sandi yang anda suka)
Autentication port: 1812
Accounting port: 1813
kamudian klik Apply dan klik OK. Lihat penampakan figure-8
cara setting user manager di RouterOS

11. Klik incoming dan contreng Accept  lalu catat port nya, kemudian klik OK seperti tampilan ini
cara setting radius dan userman di mikrotik
figure-9. port 1700 untuk koneksi dari userman ke radius server

12. Menghubungkan menu login hotspot agar si client nantinya dapat login menggunakan akun yang ada didalam database radius. Caranya : dari winbox klik manu IP pilih Hotspot kemudian klik Server Profile, double click (atau klik 2x) pada profil: hsprof1 , lebih jelasnya bisa Anda tengok pemampakan dibawah ini:
cara setting userman dan radius mikrotik
figure-10. Login Authentication Hotspot Server Profile in RouterOS.
Kemudian klik tab Radius, contreng use RADIUS dan Accounting, Lihat penampakan berikut ini
cara setting user manager dan radius di mikrotik RouterOS
figure-11. setting radius accounting di mikrotik

13. Okay, tinggalkan winbox untuk sementara waktu, kembali ke browser yaitu ke laman web user manager. Anda klik Router, Add, New seperti screenshot dibawah ini
cara setting hotspot dengan user manager
jika sudah yakin benar, klik Add.
14. Setting Paket Internet Hotspot berdasarkan durasi waktu dan kecepatan bandwidth user
Sebaiknya Anda rencanakan dahulu paket voucher yang ingin anda jual ke calon user, misalnya seprti tabel berikut:
cara setting userman hotspot mikrotik

16. Untuk mengatur limit user hotspot berdasarkan tabel diatas,
silakan klik Profile, Limitation, Add, New
cara setting radius mikrotik
ulangi langkah-16 ini sebanyak yang kita perlukan sesuai tabel diatas tadi
Keterangan gambar:
point 5. Uptime adalah batas durasi client terhubung ke internet,
3 jam dapat anda tulis dengan 3h,
5 jam dapat anda tulis dengan 5h,
1 minggu dapat anda tulis dengan 1w,
1 bulan dapat anda tulis dengan 4w2h.

17. Membuat kategori paket internet hotspot:
klik menu Profiles, dan pilih tab Profiles
klik + dan lihat pentunjuk gambar berikut :
cara setting userman dan radius untuk layanan hotspot
*** jangan lupa klik Save Profile setiap selesai bikin profile. ***

18. Membuat user radius mikrotik melalui userman 
- klik menu Users
- klik Add
- klik One untuk membuat 1 user
- klik Batch untuk membuat banyak user sekaligus
- Lihat petunjuk gambar berikut!


Done!!!
Alhamdulillah selesai sudah tutorial cara setting user manager untuk hotspot..., dan sekarang saatnya pengujian
silahkan hubungkan perangkat Anda (laptop/smarphone) ke signal hotspot anda, lalu buka browser di perangkat (laptop/android) maka akan muncul halaman login autenfikasi, masukkan saja username yang baru anda buat dari user manager, misalnya:
user name: demo
password: demo

Thursday, August 10, 2017

bootabel linux

Cara Membuat Bootable Linux Dengan USB Flashdisk

Seperti biasa, sebelum memulai pembuatan bootable linux dengan menggunakan flashdisk ada beberapa hal yang perlu anda persiapkan, antara lain :
1. USB Flashdisk: Minimal ukuran flashdisk tergantung pada distro yang akan anda install karena ukuran file iso tiap distro berbeda-beda. Sebagai contoh jika anda ingin menginstall distro ubuntu yang masih fresh ukurannya hanya sekitar 700MB, jadi cukup menggunakan flashdisk dengan ukuran 1GB. Namun jika anda akan menginstall Linux Mint dengan Cinnamon desktop ukurannya bisa mencapai 1,5GB, anda membutuhkan flashdisk dengan ukuran setidaknya 2GB.
2. Software: #Software yang akan kita gunakan adalah YUMI – Multiboot USB Creator. YUMI (Your Universal Multiboot Integrator) merupakan portable software yang bisa digunakan untuk membuat multiboot USB Flash Drive, mendukung banyak sekali distro Linux dalam pembuatan bootable usb flashdisk. Silahkan download melalui link ini
3. File ISO Linux: Anda bebas memilih distro linux mana yang akan anda install karena YUMI mendukung banyak sekali distro Linux. Sebagai contoh di artikel ini saya akan menggunakan file iso Linux Mint Cinnamon 64 bit dengan nomor versi 17.1.
Setelah semuanya sudah anda persiapkan, silahkan ikuti langkah-langkah dibawah ini untuk membuat bootable linux dengan usb flashdisk :
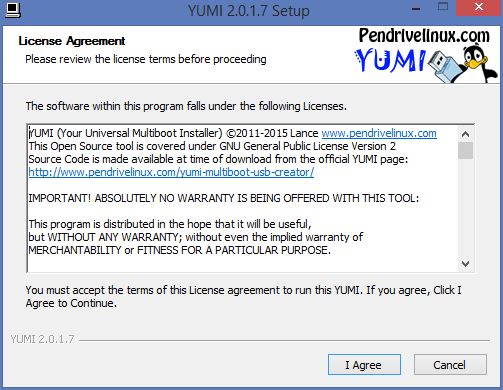
1. Silahkan buka YUMI, maka anda akan dihadapkan pada tampilan seperti pada gambar dibawah ini:
yumi_1
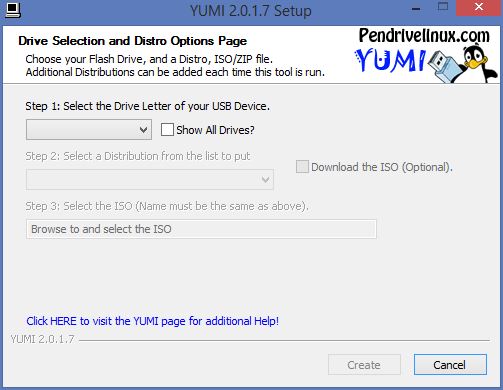
2. Pada jendela License Agreement, klik Agree dan anda akan dihadapkan pada jendela utama dari software ini.
yumi_2


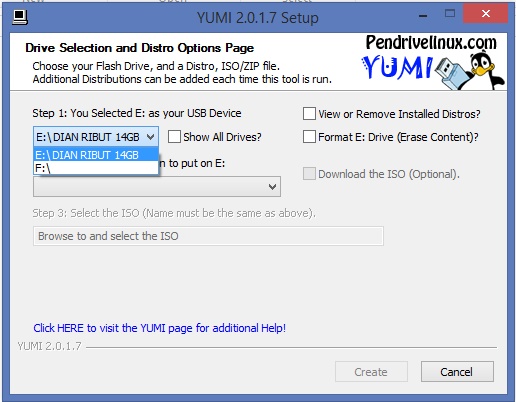
3. Pilih flashdisk yang ingin anda jadikan installer pada dropdown seperti pada gambar dibawah ini :
yumi_3
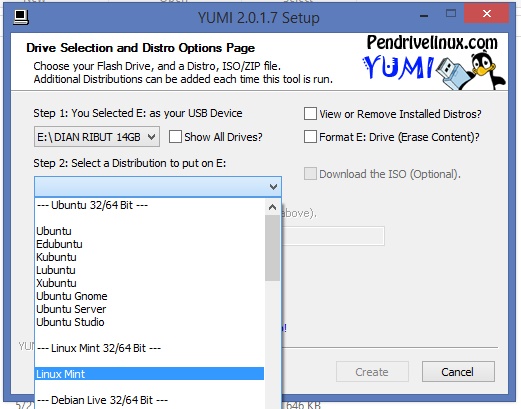
4. Setelah itu, silahkan pilih distro yang ingin anda install. Sebagai contoh saya akan menginstall Linux Mint Cinnamon 17.1 64 bit
yumi_4
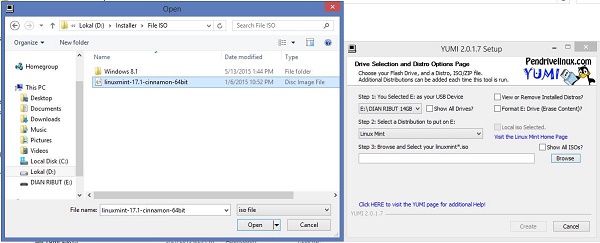
5. Klik tombol Browse, kemudian buka folder tempat penyimpanan file ISO anda dan pilih file iso yang akan anda install
yumi_6
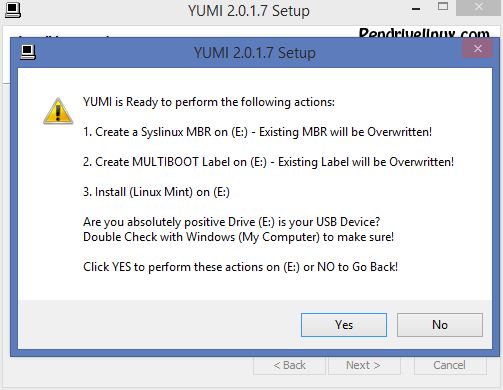
6. Setelah semua hal diatas dilakukkan, klik pada Create dan jendela berisi detail dan peringatan akhir akan muncul. Cukup klik Yes dan proses akan berjalan.
yumi_8
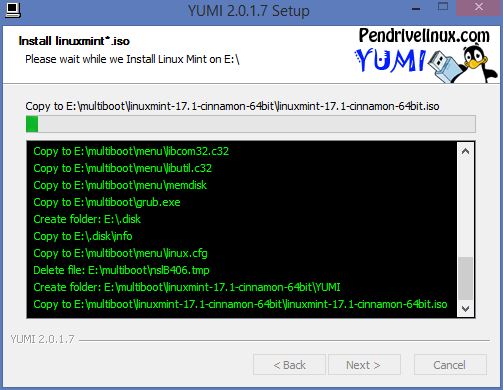
7. Tunggu sampai proses pembuatan bootable usb flashdisk selesai. Lama waktunya bisa berbeda tergantung pada distro linux yang ingin anda buat karena tiap distro memiliki ukuran yang berbeda.
yumi_9
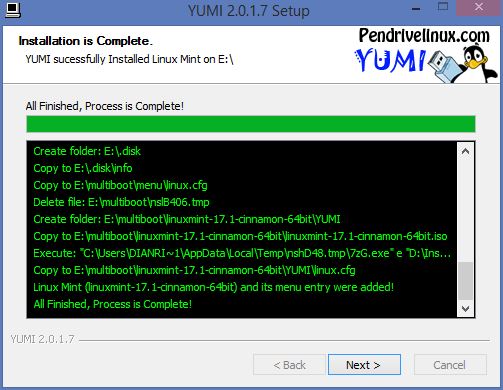
8. Setelah jendela seperti pada gambar dibawah ini muncul, berarti proses pembuatan bootable flashdisk sudah selesai. Anda bisa menutup YUMI dan flashdisk anda sudah siap untuk menginstall Linux.
yumi_10
Sampai sekarang, saya masih menggunakan YUMI – Multiboot USB Creator untuk membuat installer linux dengan usb flashdisk. Selain karena YUMI mendukung banyak sekali distro linux dari yang populer sampai yang kurang populer, YUMI juga rutin mendapatkan update baik itu untuk memperbaharui database distro linuxnya maupun untuk menambah fitur baru.


Sekian untuk artikel tutorial kali ini. Semoga bermanfaat untuk rekan-rekan semua dan terima kasih sudah membaca.

Friday, July 28, 2017

Raspberry Miner bitcoint

Possible software we need:

- Raspbian, OS .img file (http://downloads.raspberrypi.org/images/raspbian/2013-05-25-wheezy-raspbian/2013-05-25-wheezy-raspbian.zip)

- SD Formatter, to format the SD (https://www.sdcard.org/downloads/formatter_4/)

- Win32imager, to copy the .img file to the SD (http://sourceforge.net/projects/win32diskimager/)

- Putty, SSH client to connect to the Raspberry Pi (http://www.chiark.greenend.org.uk/~sgtatham/putty/download.html?)

- TightVNC, client to connect to the Raspberry Pi desktop (http://www.tightvnc.com/download.php)


Tutorial steps

1- Open Putty or any other SSH client and write the Raspberry Pi IP.

2- You will get a security alert, don't worry, say "Yes".

3- Login as: pi

4- Password: raspberry

5- The first thing to do is to change the default username and password:
- sudo adduser "youruser" --force-badname (without quotation marks)
- Will ask for the password for that new user two times and other data
- To give permissions to the new user: sudo visudo
- Will open the file sudoers.tmp
- Under the line: root ALL=(ALL:ALL) ALL add: "youruser" ALL=(ALL:ALL) ALL (without quotation marks)
- At the last line change: pi ALL=(ALL) NOPASSWD: ALL for: "youruser" ALL=(ALL) NOPASSWD: ALL (without quotation marks)
- CTRL+X to exit, Y to save followed by enter
- Now we can use sudo with the new user, to check it, use: su "youruser" (without quotation marks) to change to the new user, then: sudo raspi-config, if you can open the configuration tool, the new user is ok, close the configuration tool.
- Reboot using: sudo reboot
- Login with the new user
- Now we are going to erase the user "pi" and the files of this user with the command: sudo deluser --remove-all-files pi
- Now we have our user ready and the user "pi" doesnt' exist.

6- The next is to update the system with these steps:
- sudo aptitude update and wait until finish
- sudo aptitude upgrade Will ask "Do you want to continue?", "Y" to say Yes and wait until finish again
- Reboot using: sudo reboot

7- The next is to set a few things with the Configuration Tool with these steps:
- To open the configuration too: sudo raspi-config
- Activate "Expand Filesystem" to use all the SD card
- "Internationalisation Options" to change the language, timezone and keyboard layout
- "Advanced Options"-"Hostname" to set the visible name of the Raspberry Pi on the network.
- Reboot using: sudo reboot

8- The next is to activate the Wifi network
- To check if the Raspberry Pi is detecting the USB dongle, use the command: sudo lsusb You should see something similar to this "Bus 001 Device 004: ID 0bda:8176 Realtek Semiconductor Corp. RTL8188CUS 802.11n WLAN Adapter" but will change depending of the model you connect.
- Now we need to install the tool to set the wifi parameters using: sudo aptitude install wicd-curses Will ask "Do you want to continue?", "Y" to say Yes and wait until a blue screen, press space to select and enter to add your user to the netdev group and wait until finish
- To open the tool, use the command: sudo wicd-curses
- Move the cursor to your wifi network
- Shift+P to go to Prefs
- Check "Wireless interface", if it’s empty, write "wlan0" (Without quotation marks)
- Press F10
- Shift+R to refresh and see your wifi if you had to write "wlan0"
- Move the cursor to your wifi
- Right arrow to go to config
- You can set here a static IP, but I prefer to set the static IP in my router
- Activate Automatically connect to this network
- Key: (write the wifi password)
- Press F10
- Shift+C to connect and if you obtain an IP everything is working fine, here, you will lose the connection, use the new IP for the wifi connection and connect with Putty again.
- Login
- Shift+Q to quit
- Turn off using: sudo halt
- Disconnect the ethernet cable and turn on the Raspberry Pi again, from now should work with wifi
- From now, connect to the Raspberry Pi using the new Wifi IP

9- Now we are going to install TightVNC
- Use the command: sudo aptitude install tightvncserver Will ask "Do you want to continue?", "Y" to say Yes and wait until finish
- To start TightVNC use: tightvncserver
- Will ask for a password to connect to the remote desktop, it can be different to the Raspberry Pi password, write the password two times
- Wil ask "Would you like to enter a view-only password?", "N" to say NO to have a total control of the remote desktop.
- To autostart TightVNC every time we turn on the Raspberry Pi, we have to edit the file rc.local, using the command: sudo nano /etc/rc.local
- Now, before the line "exit 0" add the line: sudo -u "youruser" /usr/bin/vncserver :0 -geometry 1280x800 -depth 16 -dpi 100 (The user is without quotation marks, "geometry" is to set the resolution of your screen, "depth" is to set the color depth and "dpi" is to set the font size) so adjust these parameters to your needs.
- CTRL+X to exit, Y to save followed by enter

10- The last step is to install the miner, CGMiner seems to work very well with the Raspberry Pi so these are the steps:
- Before to install CGMiner we need to install this dependencies: sudo aptitude install git autoconf libtool libcurl4-openssl-dev libncurses5-dev pkg-config yasm make libusb-1.0-0-dev Will ask "Do you want to continue?", "Y" to say Yes and wait until finish.
- Now we can start installing CGMiner:
- git clone git://github.com/ckolivas/cgminer.git cgminer
- cd cgminer
- ./autogen.sh
- export LIBCURL_CFLAGS='-I/usr/include/curl'
- export LIBCURL_LIBS='-L/usr/lib -lcurl'
- ./configure --enable-bflsc
- make
- sudo make install
- The last step is to autostart CGMiner every time we turn on the Raspberry Pi:
-We need to edit autostart with this command: sudo nano /etc/xdg/lxsession/LXDE/autostart
-At the end add the line: @/usr/bin/lxterminal --geometry=90x35 -e cgminer (The parameter "geometry" is to set the size of CGMiner, so adjust the parameter to your needs)
-Reboot using: sudo reboot

11- Install TightVNC on your computer
- Write your Raspberry Pi IP
- Will ask for the password of TightVNC
- If everything is ok, you will see the Raspberry Pi desktop and CGMiner open waiting for the server details.
- Write the URL
- Write the username
- Write the password
- Now will start to mine, but we need to save the configuration file:
- "S" to go to settings
- "W" to write the config file
- "Enter" to save the default "cgminer.conf"
- "Space" to clean the screen

12- Now everything will work automatic
- If you need to stop CGMiner, use que key "q"
- If you need to reboot the Raspberry Pi, use: sudo reboot
- If you need to turn off the Raspberry Pi, use: sudo halt
- If you need to modify the config file "bfgminer.conf", open the "File Manager", "View"-"Show Hidden" and click to your user, you will see a folder ".cgminer", and inside you have the file, don't mistake with the folder without "dot".

10 Cara Dapatkan Penghasilan Pasif dari Aset Kripto

  Semua pecinta aset kripto nampaknya paham bahwa cara paling umum dalam mendulang cuan di aset kripto adalah dengan   trading . Hanya saja,...